Click  to
the right of the desired report to view it in Internet Browser.
to
the right of the desired report to view it in Internet Browser.
Click  to
the right of the desired report to view it in Microsoft Excel.
to
the right of the desired report to view it in Microsoft Excel.
Click  to
the right of the desired report to view it in Adobe Reader.
to
the right of the desired report to view it in Adobe Reader.
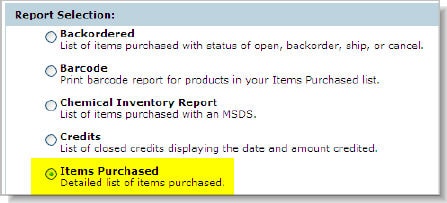
The reporting feature allows you to create reports of your previously purchased items. The following reports can be created:
Backordered — List of items purchased with status of open, backorder, ship, or cancel.
Barcode — Print barcode report for products in your Items Purchased list.
Chemical Inventory Report — List of items purchased with an MSDS.
Credits — List of closed credits displaying the date and amount credited.
Items Purchased — Detailed list of items purchased.
Items Purchased by Category — Detailed list of items purchased by category.
Items Purchased by Manufacturer — Detailed list of items purchased by manufacturer.
Items Purchased by Manufacturer and Category — Detail list of items purchased by manufacturer and category.
Month to Month Items Purchased by Category — A monthly list of items purchased by category with barcodes.
Monthly Purchased Detail — A monthly detailed list of items purchased.
Orders Placed — Detailed list of purchased orders.
Purchased Pedigree — Print report for pedigree items purchased.
Small Orders — List of orders with small order fee charges.
Total Expense — Detailed list of products purchased which includes freight, hazmat and taxes.
You can view the status of your processing reports and view the report details in your Internet Browser, Acrobat or Excel. To view the status of your reports:
Click My Account.
Click Reporting under Orders.
The Reports Summary is displayed. All reports are listed and categorized in the Reports Summary. All reports are listed at the top with their name, criteria, date created, status, link to view and link to delete. If you had setup Scheduled Recurring Reports, they are listed at the bottom with their name, type, frequency, link to edit and link to delete. All reports are accessible it for up to 90 days.
You can sort, view and delete reports. To sort reports, select from the Sort by drop-down list. You can sort by:
Date Created
Report Name
Status
To view report details:
Click to
the right of the desired report to view it in Internet Browser.
Click to
the right of the desired report to view it in Microsoft Excel.
Click to
the right of the desired report to view it in Adobe Reader.
Note: Also, you can have the report e-mailed to you but you must select this option when creating the report.
All reports that are listed in the Reports Summary are accessible it for up to 90 days. However, you can delete a report before 90 days. To delete a report:
Click  next to the desired
report.
next to the desired
report.
Click OK to confirm.
Scheduled recurring reports are created automatically generated based on the frequency (daily, weekly or monthly) you select. You can edit and delete recurring reports.
To change an option, like how frequent the report is created, edit the report. To edit a scheduled recurring report:
Click  to the right of the desired report.
Make the necessary changes and follow the instructions.
Click Finished.
To stop a report from occurring again, delete the report. To delete a scheduled recurring report:
Click next to the desired
report.
Click OK to confirm.
You can create one-time or scheduled recurring reports based on your report settings.
One-time Reports — are created by selecting the default settings or custom settings, which include data for the current location within the last 12 months.
Scheduled Recurring Reports — are created by selecting the custom settings, which allow you to define report criteria, such as date range, scheduling, locations, and preferences. The first scheduled recurring report is automatically generated and appears in the report summary. Subsequent scheduled recurring reports are not viewable online until they are generated, at which time, they will appear in the reports summary. Also, a reminder is automatically e-mailed to you when the reports are available. The email will contain the report in the format (HTML, Excel or PDF) you chose when creating it and a link to view it on the web site.
To create a report:
Click New Report from the Reporting Page.
Select the type of report from the available list.
Follow the instructions.
Note: Report types have their own specific options which may or not include standard/custom and one-time/scheduled recurring settings.
If available, select Default Settings or Custom Settings.
Default Settings — Standard Reports are generated based on predefined settings. The report will include data for the current location within the last 12 months. Select this option to create one-time reports.
Custom Settings — Custom Reports allow you to define report criteria, such as date range, scheduling, locations, and preferences. Select this option to create scheduled recurring reports and one-time reports.
Follow the remaining instructions.
Click Finished.
Let's look at some of examples of the report types that can be created.
Example 1: Create a one-time report for all items purchased within the last 12 months.
Select Items Purchased for the report type and click Next.
Select Default Settings and click Next.

Once created, this report will be listed in the Reports Summary where you can view its details.
Example 2: Create a scheduled recurring monthly report for the items purchased each month.
Select "Items Purchased" for the report type and click Next.
Select Custom Settings and click Next.

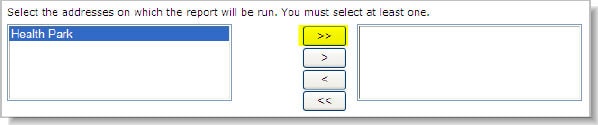
Select the
addresses on which the report will be run, click  and then
Next.
and then
Next.
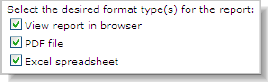
Select the desired format type(s) for the report and click Next.
Select Recurring Report and click Next.

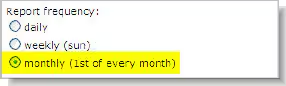
Select Monthly and click Next.
Select All Items and click Next.
Select Item Details and click Next.

Enter Monthly Items Purchased and click Finished.

Once created, the first report will be listed in the Reports Summary where you can view its details. Subsequent reports will be available on the first day of every month.
Example 3: Create a one-time report for all items purchased within the last month.
Select "Items Purchased" for the report type and click Next.
Select Custom Settings and click Next.
Select the
addresses on which the report will be run, click and then
Next.
Select the desired format type(s) for the report and click Next.
Select One-time Report and click Next.

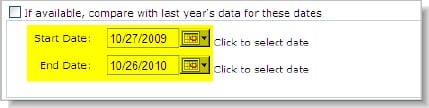
Select Starting and Ending Dates. Click Next.
Select All Items and click Next.
Select Item Details and click Next.
Enter Items Purchased within the Last Month and click Finished.

Once created, this report will be listed in the Reports Summary where you can view its details.
![]()